HTML5 APIs
An overview of JavaScript powered Web APIs that extend the functionality of the Web Browser

Agenda
-
01Media API Interact with Video & Audio Elements
-
02Drag and Drop API All the Web's a Stage
-
03Geolocation API Where in the World are we?
-
04Canvas API The Web Browser as a Painting Canvas
-
05Web Storage API Verba volant, (Java)Scripta Manent
-
06Explore further Web Sockets, File API, Web Workers, and many more...
01
Media API
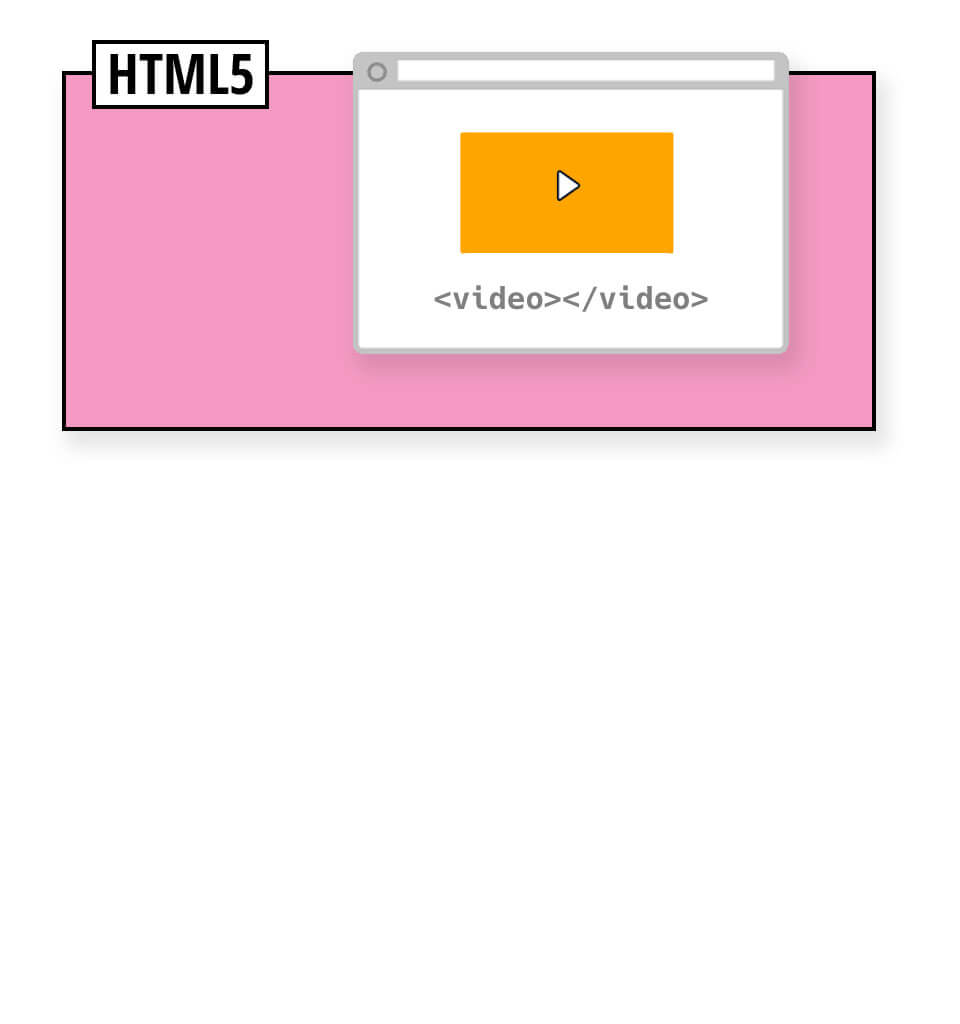
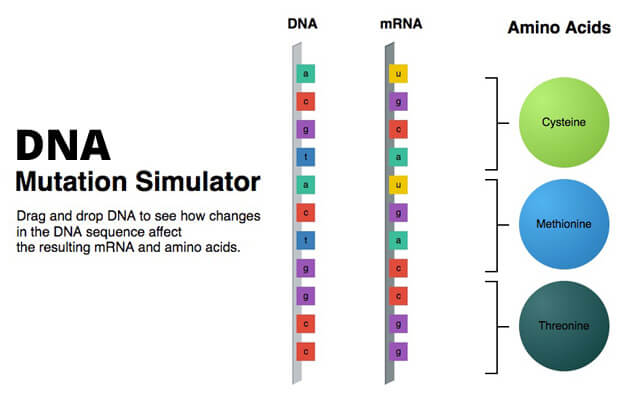
HTML5 can natively render video and audio in web pages using the <video> and <audio> HTML Media Elements.
HTML5
Media Elements
                                Let's add a video:

                                    <video src="trailer.mp4"></video>


                                    <video src="https://video.com/trailer.mp4"></video>
                                Let's add some music:

                                <audio src="mozart.mp3"></audio>


                                <audio src="https://audio.com/mozart.mp3"></audio>
The <source>
Media Element
1) Opening <audio> tag
2) First audio source: mp3 file with appropriate MIME type attribute
"A media type (also known as a Multipurpose Internet Mail Extensions or MIME type) is a standard that indicates the nature and format of a document, file, or assortment of bytes."
3) Second audio source
4) Ready!
                                <audio controls>

                                    <source src="audio.mp3" type="audio/mp3">

                                    <source src="audio.ogg" type="audio/ogg">

                                </audio>
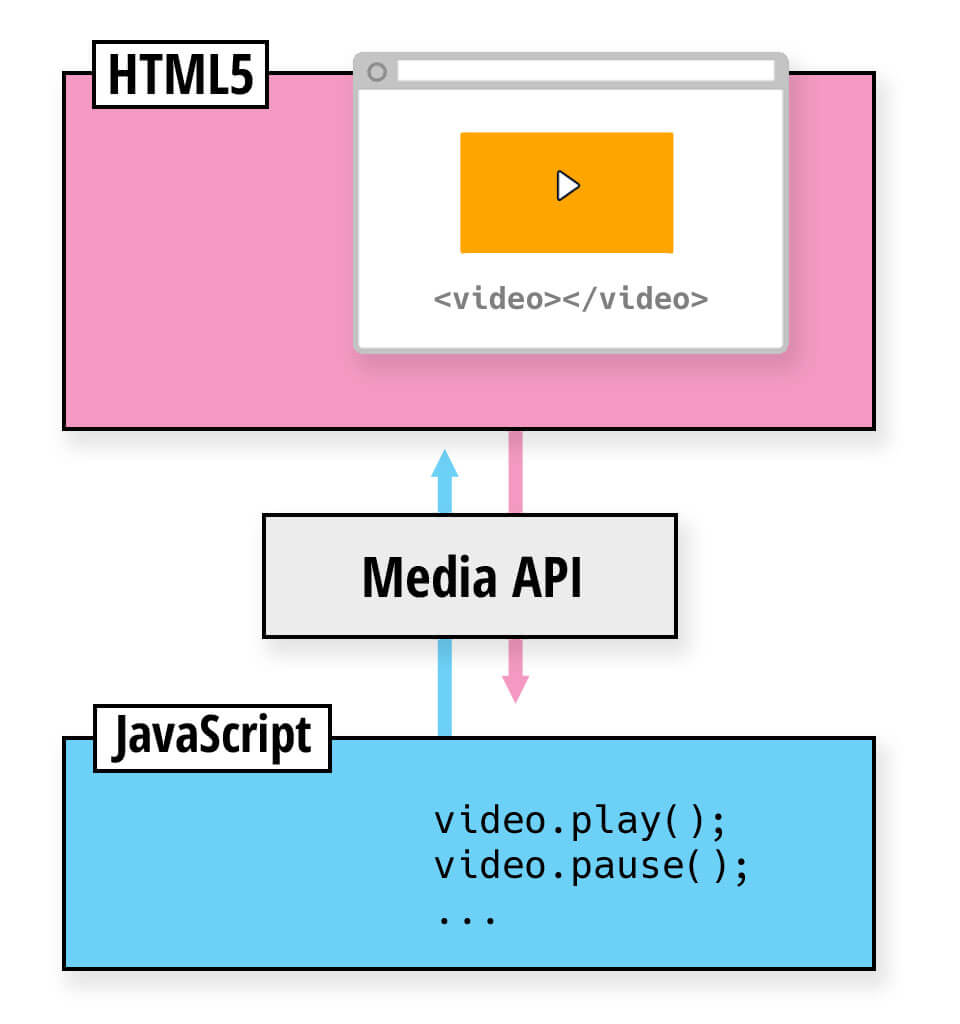
Media API
The Media API allows you to interact with the Media Elements. It acts as a middleman, offering a set of commands for observing and controlling the Media elements.
Media API
Methods & Properties
Code Time!
( Class-Practice-01 )
1) Create an HTML page
2) Add a <video></video> element (Use this source)
2.1) Add a poster attribute. (Use this source)
3) Add a <script></script> tag just before the closing </body> tag
4) Use document.querySelector() to target the video element and store it in a variable named video
5) Use Media API methods
Methods:
video.play();
video.pause();
Combine setTimeout and play/pause
Combine the click event with play/pause
Challenge #1: apply background fade effect on play/pause
Challenge #2: Attach Play/Pause events directly on the video
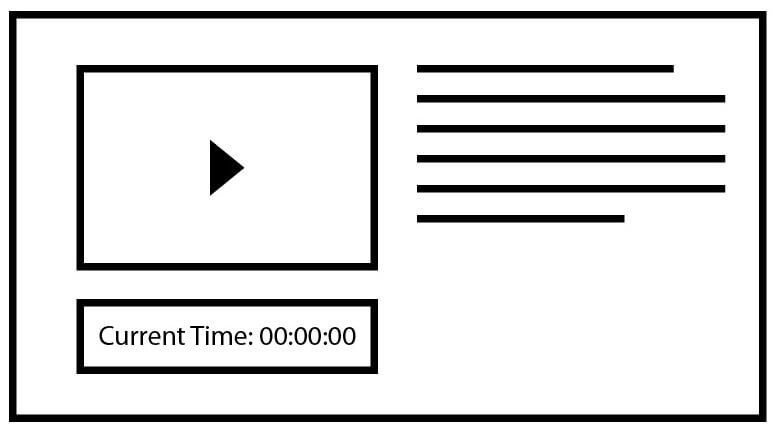
Properties: ( Must be used with proper events )
video.duration;
video.currentTime; // GET
video.currentTime = 100; // SET
Full list of MediaElement Properties and Methods
Media API
Events
Code Time!
( Class-Practice-02 )
canplay
play
pause
ended
loadeddata / loadedmetadata
Combine loadedmetadata event with duration property
timeupdate
Combine timeupdate event with currentTime property
References & Sources:
- ▸ <audio> - The Audio Embed Element
- ▸ HTML5 Audio at w3schools.com
- ▸ <video> - The Video Embed Element
- ▸ Video Elements: [ Demo | Source ]
- ▸ MediaElement API: [ Demo | Source ]
- ▸ HTML5 Video at w3schools.com
- ▸ HTML5 Video Basics
- ▸ MIME Types
- ▸ Interactive Screencast: Embedding Videos in HTML
- ▸ Cheetahs on the Edge (Wikimedia video): ogv
- ▸ Big Buck Bunny in multiple formats: mp4 | ogv | webm
02
Drag & Drop API
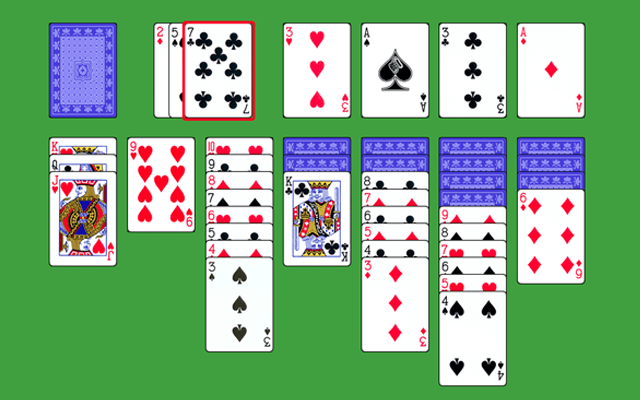
Introduced with the HTML5 specification, the Drag and Drop API gives us the ability to drag elements from one place and drop them on other elements, much like our Operating Systems (Windows, Mac, Linux) and Desktop applications work.
Applications
Business

Scientific
Games
Your imagination is the limit!
The Basics
1) Create some draggable elements (source)
2) Create some droppable elements (target)
3) Select a draggable element with a mouse
4) Drag the element to a droppable element and release the mouse button
The Code - 1/3
1) Create a draggable Element and a drop target Element
2) Making an element draggable is as simple as setting the draggable attribute of an element to true
3) Setting an element as a drop target requires to disable the default dragover behavior.
3.1) Get the drop element.
3.2) Define a function that will prevent the default dragover behavior.
3.3) Handle the drop event.
HTML
                                <div id="draggable" draggable="true"> Draggable Element </div>

                                <div id="drop-target"> Drop Target </div>
JavaScript
                                let dropTarget = document.querySelector("#drop-target");

                                function handleDragOver( event ){ event.preventDefault(); }

                                dropTarget.addEventListener( "dragover",handleDragOver );
The Code - 2/3
dragstart and drop events to be handled.1) Store a reference of the draggable element in a variable
2) Handle the dragstart event of the draggable element
2) Handle the drop event of the drop element
JavaScript
                            // ...Code from Part 1/2
                            let draggable = document.querySelector("#draggable");

                            draggable.addEventListener( "dragstart", handleDragStart );

                            function handleDragStart(e){
                                console.log( e );
                            }

                            dropTarget.addEventListener( "drop", handleDrop );

                            function handleDrop(e){
                                console.log( e );
                            }
The DataTransfer Object
The DataTransfer object holds the data that is being dragged during a drag and drop operation.
It holds one or more data items, each of one or more data types.
In its simplest form, transfering data from a draggable element to a drop target is a 2-step process:
Step 1) Set data on dragstart event using event.dataTransfer.setData( format, data )
Step 2) Read data on drop event using event.dataTransfer.getData( format )
The Code - 3/3
1) Set some simple text data when the drag starts.
2) Access the data on the drop event.
JavaScript
                                // ...Code from Part 2/2
                                function handleDragStart(e){
                                    e.dataTransfer.setData( "text/plain", "Some data" );
                                }

                                function handleDrop(e){
                                    let data = e.dataTransfer.getData( "text/plain" );
                                }
Let's Code!
Let's build a Tasks Board
Tasks
- Application Planning
- Boilerplate
- Coding
In Progress
Done
Summing-Up
1) Create a draggable element
2) Listen on the dragstart event
3) Set some transfer data
4) Create a droppable element
5) Prevent default behavior on the dragover
event and listen on the drop event
6) Get the transfer data
References & Sources:
- ▸ HTML Drag and Drop API | MDN
- ▸ HTML5 Drag and Drop | W3Schools.com
- ▸ Drag & Drop With Vanilla JS | YouTube
- ▸ Drag and Drop with HTML5
- ▸ Native HTML5 Drag and Drop
- ▸ Drag and Drop Events
- ▸ dataTransfer data formats
- ▸ The W3C Specification
- ▸ The Tasks Board App: [ DEMO | SOURCE ]
- ▸ The Kid's Shape Sorting Game: [ DEMO | SOURCE ]
03
Geolocation API
An easy to use API for accessing the browser's location.
For privacy reasons, the user is asked for permission to report location information.

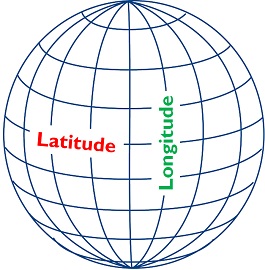
Geographical Coordinates
A Primer on Latitude & Longitude
"Cartographers and geographers trace horizontal and vertical lines called latitudes and longitudes across Earth's surface to locate points on the globe."
"Together, they form the Earth’s geographical coordinates, and represent the angular distance of any location from the center of the Earth."
The Code
1) Define a callback function that will handle the successful Geolocation retrieval
2) Define a callback function that will handle errors
3) Check to see if our browser supports the Geolocation API
4) Use the getCurrentPosition method to initiate the geolocation retrieval process
Remember: getCurrentPosition() is an asynchronous function
5) Handle browsers that do not support Geolocation
JavaScript
                            function geoSuccess( position ){
                                console.log( position );
                            }

                            function geoError( error ){
                                console.log( error.message );
                            }

                            if ( navigator.geolocation ) {

                                navigator.geolocation.getCurrentPosition( geoSuccess, geoError );

                            } else {

                                // Geolocation API Not Supported

                            }
The Data
& Error Objects
geoSuccess( position ){ ... }
geoError( error ){ ... }
                                position: Object {
                                    timestamp: [ date/time of the Response ],

                                    coords: {

                                        latitude: [ Latitude as decimal ],
                                        longitude: [ Longitude as decimal ],
                                        accuracy: [ Accuracy of position ],
                                        altitude: [ Altitude in meters above sea level ],
                                        speed: [ Speed in meters/second ],

                                    }
                                }
                                error: Object {
                                    code: [ 1-3 ],
                                    message: [ String Error Description ]
                                }
Let's Code!
Display Browser's Geolocation on a Map
Using Open Street Maps & OpenLayers
OpenStreetMap (OSM):"A collaborative project to create a free editable map of the world. The data is free, and free of legal and technical restrictions."
OpenLayers: "OpenLayers is a JavaScript library which implements an API for developing dynamic map widgets on the web."
OpenLayers Quickstart
Click, Copy & Paste!
Notable method: watchPosition()
Summing-Up
1) Check if the Browser supports the Geolocation API
2) Call the getCurrentPosition() method to asynchronously get the position data
3) Handle errors
4) Use the data accordingly
04
Canvas API
Where can it be used?
Applications
Graphics
Games

The Basics

1) Add a <canvas> element in the webpage

2) Get access to the <canvas> drawing context (2D,3D)

3) Use the context Object methods and properties to paint on the canvas
The Code
1) Place a <canvas> element in your webpage
2) Get a reference to the canvas element via JavaScript
3) Get a reference to the canvas 2D Context
4) Start drawing using the 2D Context
HTML
<canvas id="canvas" width="200" height="100"></canvas>
JavaScript
const canvas = document.querySelector("#canvas");
const context = canvas.getContext("2d");
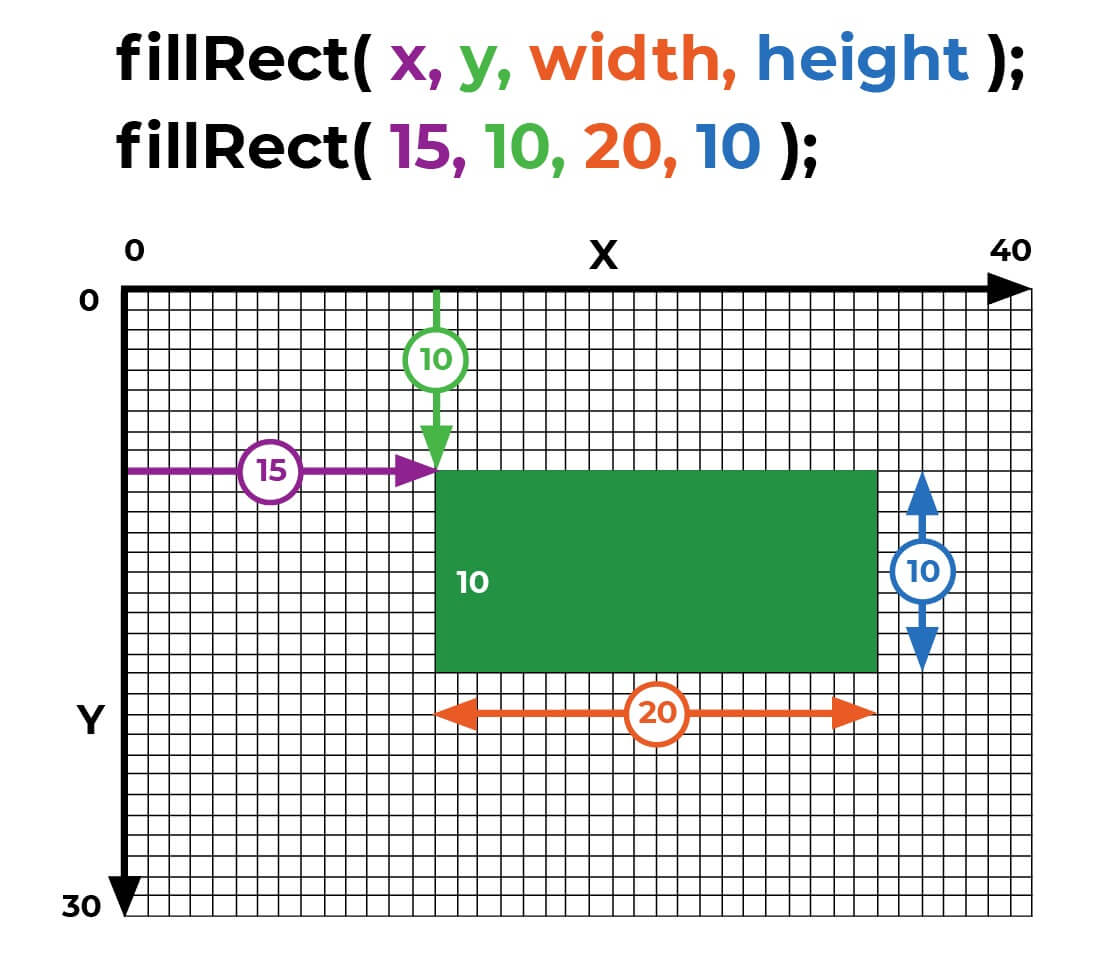
context.fillRect( 0, 0, 200, 100 );
Let's Code!
Jamaica, Jamaica!
Summing-Up
1) Place Canvas
2) Get Context
2) Start Drawing!
References & Sources:
- ▸ Canvas API | MDN
- ▸ HTML Canvas | W3Schools.com
- ▸ Drawing the PacMan Figure using Canvas API [ Start | Finished ]
- ▸ Canvas tutorial
- ▸ HTML5 Canvas Tutorials
- ▸ Drawing shapes with canvas
05
Web Storage API
1) sessionStorage: Storage for each given origin available as long as the browser is open, including page reloads.
2) localStorage: Just like sessionStorage, but persists when the browser is closed and reopened.
Data gets cleared only through JavaScript. No expiration date.
Data is never transferred to the Server
The Code
1) Check if localStorage is supported
2) Store a key, value pair
3) Retrieve a key value
4) Get number of key/value pairs stored
5) Get key value using index number
6) Clear key/value pair
7) Clear all key/value pairs
8) Same rules apply for sessionStorage
Storage data can also be accessed through the Browser's Developer Tools. On Chrome, go to: Developer Tools > Application > Storage > Local Storage
JavaScript
                                if ( localStorage ){

                                    localStorage.setItem( key, value );

                                    localStorage.getItem( key );

                                    localStorage.length;

                                    localStorage.key( index );

                                    localStorage.clearItem( key );

                                    localStorage.clear();

                                }

                                if ( sessionStorage ){
                                    sessionStorage.setItem( key, value );
                                }
Challenge #1
Sources: [ Video | Poster Image ]